
Your General Contractor has invited you to collaborate on a project using Clearstory — a change order management platform that gives both companies real-time visibility into Change Order Requests (CORs), Time & Material Tags (T&M Tags), and Change Notifications on your shared project.
Clearstory is free on Plus projects — projects where your GC has invited you. You do not need to purchase anything. You can upload CORs, create T&M Tags, and respond to Change Notifications at no cost and with no usage limits. You can also create your own Basic projects independently, which are free within usage limits.
This guide covers everything you need to get set up and start working.
Table of contents
Part 1: Set Up Your Account
- Accept Your Project Invite
- Upload Your Company Logo
- Set Up Project-Level Rates
- Invite Your Team
- Download the Mobile App
Part 2: Working on Your Project
- Upload a Change Order Request (COR)
- Create a COR Using Clearstory's Template
- Create a Time & Material Tag (T&M Tag)
- Respond to a Change Notification
- Navigate Your Logs
What Your GC Expects
Your GC invited you to Clearstory so both companies are working from the same shared change order log. Depending on the project requirements, you may be asked to do some or all of the following:
- Upload or create Change Order Requests in Clearstory's shared COR log so your GC has a complete, real-time view of all CORs on the project.
- Create digital T&M Tags using Clearstory's mobile app instead of paper tickets.
- Respond to Change Notifications when your GC distributes bulletins, addendums, ASIs, or design changes for pricing.
Check with your GC if you're unsure which of these apply to your project.
Part 1: Set Up Your Account
When you first log in, you'll see a "Let's Get Your Account Set Up" checklist in the app. The steps below walk through each item — plus one the checklist doesn't prompt you for that will save you significant time on every T&M Tag you create.
1. Accept Your Project Invite
You'll receive an email from Clearstory with a "Join Project" button.
- Click Join Project in the email.
- If you don't have a Clearstory account yet, you'll be walked through a quick signup: work email, name, company name, and a password.
- If you already have an account, log in and the project will be added automatically.
Missed the email? Go to clearstory.build, click Log In, and enter the work email your GC used to invite you. You should see a pending invite on your Projects page.
Still don't see it? Ask your GC to resend the invite, or message Clearstory support using the chat widget in the bottom-left corner of any page.
For a detailed walkthrough: How to Accept a Project Invite
2. Upload Your Company Logo
Your logo appears on every T&M Tag, COR, and COR log you share through Clearstory. Only account owners and admins can upload a logo.
Navigate to Settings → Company Information to upload your logo and add your company address.
Guide: How to Add Your Logo and Use the Cropping Tool
3. Set Up Project-Level Rates
This is the setup step most people skip — and it's the one that saves the most time.
When you set up labor, material, and equipment rates on a project, Clearstory auto-populates pricing every time you create a T&M Tag or a COR. Instead of manually typing the rate for every line item on every tag and every change order, you select from your pre-loaded rates and the math is done for you. Your COR markup section — bonding, insurance, overhead, tax — also auto-calculates from these rates.
Without project rates, every T&M Tag and COR means entering prices by hand. With them, it takes seconds.
To set up rates on your project:
- Navigate to Projects → [Your Project].
- Open the project's rate settings.
- Add your labor categories and hourly rates, material items, and equipment rates.
These rates are specific to this project — you can set different rates on different projects as needed.
Guide: Input and Manage Your Company's Labor, Material, Equipment and Mark Up Rates
If you have a lot of rates, you can import them from a CSV file instead of entering them one by one. Guide: How to Import Your Rates
4. Invite Your Team
Add co-workers so your whole team can create T&M Tags and track CORs on the project.
First, add them to your Clearstory account:
- Navigate to Settings → Manage Users.
- Click + Add User.
- Choose a role:
- Admin — full access to your entire Clearstory account.
- Project Manager — access to information on their assigned projects only.
- Field User — can create T&M Tags but cannot see financial details.
- Enter their info and click Submit. They'll get an email to set their password.
Then, add them to the project:
- Navigate to Projects → [Your Project] → My Company Users.
- Select their name from the dropdown and click Add to Project.
Guide: How to Invite Users in Your Company to a Project
For a full breakdown of what each role can access: What Are the Permissions for Each User Role?
5. Download the Mobile App
If your GC requires digital T&M Tags, you'll need the free Clearstory mobile app. Even if T&M Tags aren't a project requirement, the app is useful for reviewing CORs and checking your logs on the go.
Log in with the same email and password you used to create your Clearstory account.
Guide: Clearstory Mobile App Guide
Part 2: Working on Your Project
Once your account is set up, these are the day-to-day workflows you'll use on the project.
Upload a Change Order Request (COR)
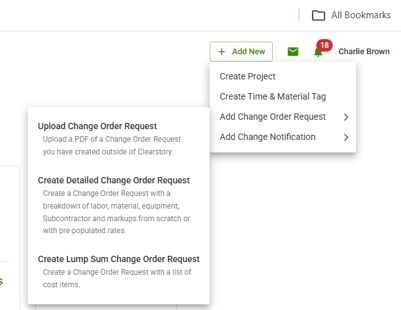
This is the fastest way to get a COR onto the shared log — most people start here. If you already have a COR as a PDF, uploading takes about 30 seconds.
- From any page, click + Add New in the top-right corner.
- Select Upload Change Order Request.
- Choose the project, drag and drop your PDF, fill in the required fields (COR number, subject, amount), and click Send.
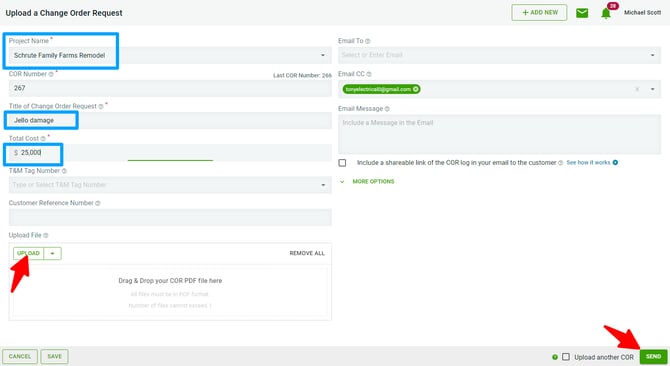
Your COR instantly appears in the shared COR log visible to both you and your GC.
Guide: How to Upload a COR
Create a COR Using Clearstory's Template
Uploading PDFs works, but creating CORs directly in Clearstory is where the platform pays off — especially if you're also using T&M Tags.
Why use the template instead of uploading a PDF?
- Convert T&M Tags to CORs in one click. Select one or more signed T&M Tags and Clearstory automatically fills in the labor, material, equipment, and other cost line items. No scanning paper tickets, no manually transcribing quantities, no re-entering data you've already captured in the field.
- Rates and markup auto-calculate. If you set up project-level rates (Step 3 in Part 1), pricing populates automatically when you add line items. Your markup section — bonding, insurance, overhead, tax — auto-calculates based on your project settings.
- Standardized, audit-ready format. Every COR goes out with a consistent, professional format that breaks down costs by labor, material, and equipment with approved rates and markup percentages. GCs review these faster because the format is clean and predictable. Auditors can verify rates match contract terms at a glance.
- Supporting docs bundled automatically. T&M Tags, photos, and attachments are packaged with the COR — your GC gets the full backup in one place.
- Your COR log updates itself. No manual log maintenance. Every COR you create is instantly tracked in the shared log with status, dates, and a complete activity history.
How to create a COR from the template:
- Click + Add New → Create Change Order Request.
- Select the project. Clearstory auto-generates the next COR number.
- Add a title and description.
- To pull in T&M Tag data, click Select Existing Tag, choose your tags, and click Add — labor, material, equipment, and other costs fill in automatically.
- Review the markup section (auto-populated from your project rates), make any adjustments, and click Send.
Or convert directly from the T&M Log: Go to your T&M Log, select a signed tag, and click Create COR (the green wrench icon). Your COR is generated with that tag's data already filled in.

Guide: How to Create a COR in Clearstory
To bundle multiple T&M Tags into a single COR: How to Create a COR from Multiple T&M Tags
Create a Time & Material Tag (T&M Tag)
If you set up project-level rates (Step 3 above), creating a tag is fast — select your labor, material, and equipment items, add quantities, and pricing auto-populates. Once a tag is signed, you can convert it into a fully priced COR with one click (see "Create a COR Using Clearstory's Template" above).
From the mobile app:
- Open the app and tap Create T&M Tag.
- Select the project.
- Add the date, description of work, labor hours, materials, equipment, and photos.
- Submit — your GC receives it and can review, sign, or request revisions.
From the website: You can also create and edit T&M Tags from your desktop.
Mobile guide: How to Create a T&M Tag on the Mobile App
Web guide: How to Create and Edit T&M Tags on the Website
Respond to a Change Notification
Your General Contractor might use Clearstory's Change Notification feature to distribute pricing exercises like Bulletins, Addendums, Design Drawings, ASI's, etc. Here is what you will see:
- You will receive an email with a link to view the files that contain the changes to be reviewed.
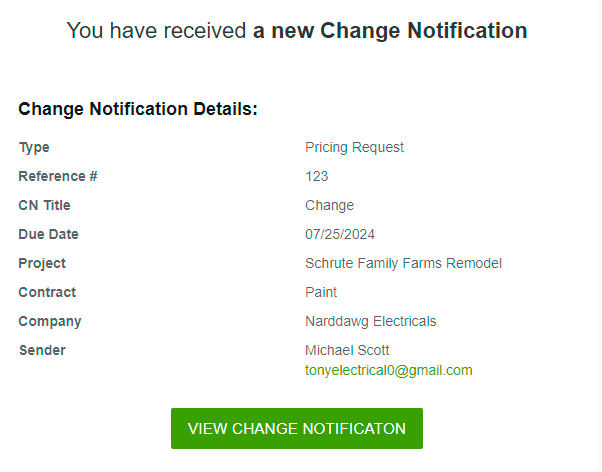
- To view the Change Notification you will log in to the Clearstory web application and navigate to Change Notification Log > Received Log.
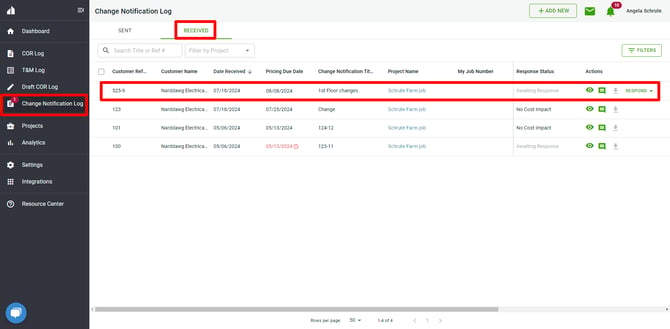
- From this page, you can do the following:
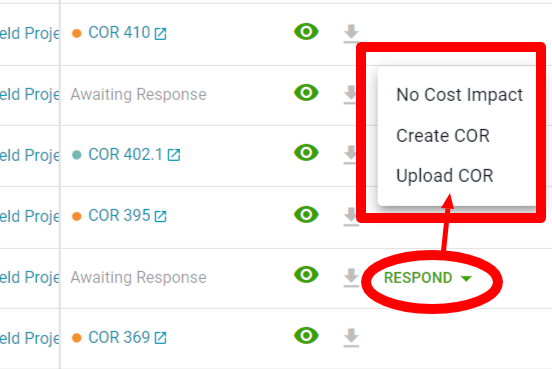
- Respond by clicking on the "Respond" link located on each line item where you will be given three options. You can respond with the following:
- No Cost Impact: If the change does not effect your scope of work you can quickly respond by saying no cost impact. This will notify your general contractor there is no cost impact and a COR will not be added to your log.
- Upload COR: If you select upload COR, you can drag and drop your associated cost impact in response to the change.
- Create COR: You can respond by creating a Change Order using one of Clearstory's COR templates.
- View and download the documents you were sent.
- View the details.
- Respond by clicking on the "Respond" link located on each line item where you will be given three options. You can respond with the following:
Guide: How to Respond to a Change Notification
Navigate Your Logs
COR Log: In the left-hand navigation, click COR Log → Sent to see every COR you've submitted on the project with its status, amount, and date. Click any COR to view the document, add comments, or see the activity history. Your GC sees the same log in real time.
Guide: How to Navigate the COR Log
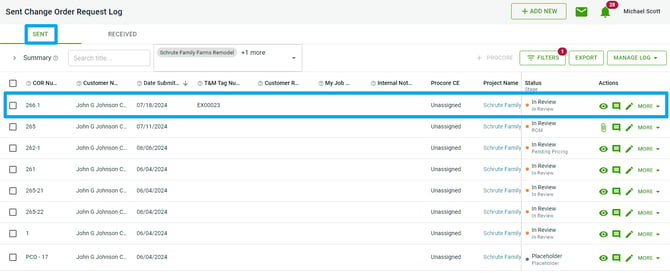
When your GC adds review comments or requests revisions on a COR, you can respond directly in the platform. Guide: How to Review, Add Comments, and Update CORs
T&M Log: Click T&M Log to see all tags filtered by status and whether they have a corresponding COR.
Guide: How to Navigate the T&M Log
Frequently Asked Questions
Is Clearstory free for me? Yes. Projects your GC invites you to are Plus projects — fully featured with no usage limits. If you create your own projects independently (to use with other GCs or customers), those are Basic projects, which are free within usage limits. To upgrade your own projects, talk to the Clearstory team.
Do I need to download an app? Only if your GC requires digital T&M Tags. The mobile app is free on iOS and Android. Everything else can be done from the website.
What can my GC see? Your GC can see the CORs, T&M Tags, and Change Notification responses you submit on the shared project. They cannot see anything from your other projects or customers.
I already created my own project for this job and now I have a duplicate. You can merge them. See: How to Link / Merge Existing Projects
Can I use Clearstory on other projects? Yes. You can create your own Basic projects and invite your GCs or customers, even if they don't use Clearstory — Basic projects are free within usage limits. To unlock full features like company-level rate groups and remove usage limits on your own projects, schedule a call with the Clearstory team.
Where do I get help? Chat with support from the left navigation menu. If a Clearstory Success Manager reached out to you about this project, contact them directly for the fastest response.