Tutorial Videos:
How to Create a T&M Tag
Below is a video on how to create a T&M Tag on the mobile app.
1. Add Summary Information
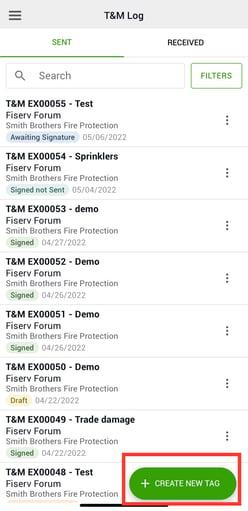
To get started click on "Create New Tag" from the main log screen.
Add the details related to the T&M Tag.
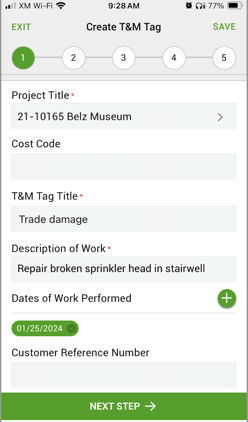

- Select Project: The first step is to select the project related to the T&M Tag you are creating.
- Cost Code: If you want a cost code to show up on the tag you can enter one, however this field is optional
- Title of T&M Tag: The title of the T&M Tag is an abbreviated description of the work performed. This title shows up in the email that gets sent out with the tag and is shown on the T&M log in the web and mobile app.
- Description of Work: The description of the work is a more detailed overview of the work performed that is shown on the T&M Tag PDF that gets created.
- Date of Work Performed: Select the dates of work was performed that will be tracked on the T&M tag. You can also date individual line items later in the workflow.
- Customer Reference Number: The customer reference number is the tracking number given by the customer or General Contractor to track the additional work. Often this is called a PCO, PCI or CE number.
- Add Photos: You can attach photos from your photo library or take live photos from your camera and they will be attached to the T&M Tag PDF as back-up documentation. The system time stamps all photos based on when they were taken.
- Upload Files: You can attach files from your phone as back-up documentation.
2. Add Labor
The next step is to add labor for the T&M Tag.
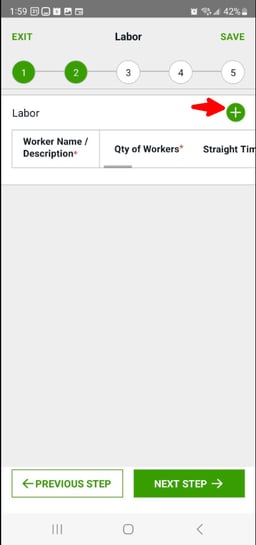
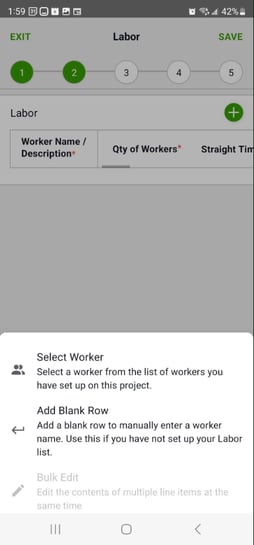
- Select Labor Type: Click the green + to select an existing worker or add a blank row
- Press Select Worker, choose your existing worker(s) and click ADD. To do this you will need to add your labor rates in the Clearstory web app. You can select multiple labor types at once. Tip: By typing in the entry field it will search and narrow the drop-down list.
- Press Add Blank Row to manually type in a labor type.
- Select Date of Work: By clicking on the calendar icon you can add a date to each line item. This way you can track who did what each day. *This is optional*
- Add Quantity of Workers: Here you can add multiple workers to one line item. So if (3) journeyman worked 8 hours you would enter 3 here as the number of workers.
- Add Number of Hours: Here you add the number of hours each worker worked. So for example, if you added (3) journeyman you would enter 8 here since they each worked 8 hours. If they each additionally worked 2 hours over overtime you can enter the 2 hours of "OT" on the same line item.
- Type of hours: By default, Clearstory tracks the following as standard hourly rates:
- Straight Time
- Overtime
- Double Time
- Premium Overtime (If you are just tracking the added overtime cost)
- Premium Double Time (If you are just tracking the added double-time cost)
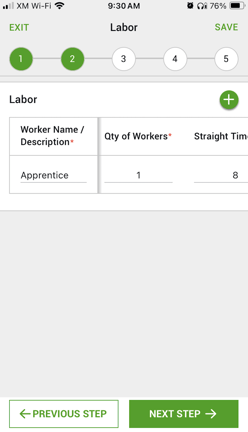
Once you have completed filling in the labor, tap "Next Step".
3. Add Material
The next step is to add material for the T&M Tag.
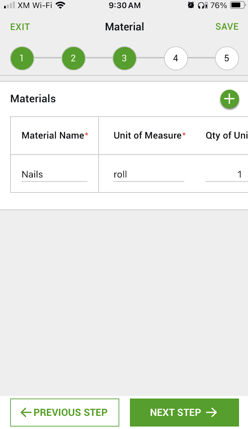
- Select Material Type: You can add a material line item in two ways.
- Choose "Select Material" to choose from the drop-down list of preloaded material items. To do this you will need to add your material rates in the Clearstory web application. Tip: By typing in the entry field it will search and narrow the drop-down list.
- Select "Add Blank Row" to manually type in a material name.
- Add Material Unit: If you select the material item from the drop-down list the unit will pre-populate automatically. If you manually enter the material name, you will need to enter the unit. The unit is the unit in which you measure this particular material. For example, drywall would be measured in sheet, paint could be measured in bucket, etc.
- Add Quantity Installed: Lastly, add the quantity of the unit that was installed.
- Select Date: By clicking on the calendar icon you can add a date to each line item. This way you can track multiple days on each tag.
Once you have completed filling in the material, tap "Next Step".
4. Add Equipment
The next step is to add equipment for the T&M Tag.
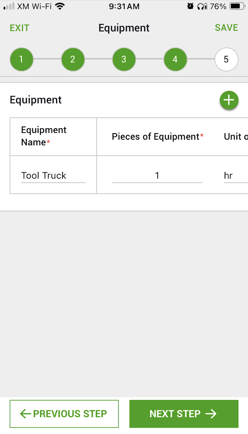
- Select Equipment Type: You can add an equipment line item in two ways.
- Choose "Select Equipment" to choose from the drop-down list of preloaded equipment items. To do this you will need to add your equipment rates in the Clearstory web application. Tip: By typing in the entry field it will search and narrow the drop-down list.
- Select "Add Row" to manually type in a equipment name.
- Add Equipment Unit: If you select the equipment item from the drop-down list the unit will pre-populate automatically. If you manually enter the material name, you will need to enter the unit. The unit is how you measure this particular item. For example, you could measure equipment usage by hours, days, weeks, etc.
- Add Quantity Installed: Lastly, add the quantity of the unit that was installed. So if you are measuring the equipment in hours you would add the amount of hours.
- Select Date: By clicking on the calendar icon you can add a date to each line item. This way you can track multiple days on each tag.
Once you have completed filling in the equipment, tap "Next Step".
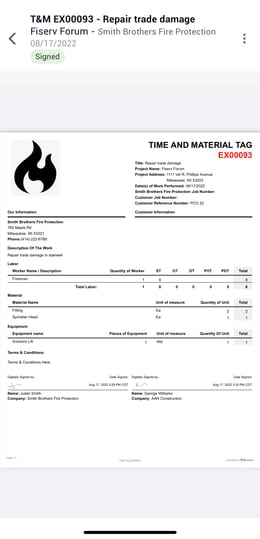
5. Review and Collect Signatures
The final step is to review and edit your T&M Tag. From this page, there are several things you can do.
For information on getting multiple signatures on your tags, check out our guide here.
- Quickly make edits to any of the items you added above by tapping on the item it will open the edit page.
- If you need to add a line item simply tap the plus button in any of the sections.
- By tapping the "Exit" at the top right-hand corner of the page you can delete the Tag or save it as a draft. If you save the T&M Tag as a draft it will be visible to anyone else in your office on that project team. This way other team members can open the tag, review it, and make any edits on their own.
- By tapping the "Preview Tag" button the system will generate a preview of the T&M Tag PDF along with the pictures. This is a great opportunity to show your customers the PDF that they will be signing.
Signatures
You will first sign yourself, and then either get your customer(s) to sign directly on the device, or request they review and sign via email:
- To sign yourself, tap the "Tap to Sign" option and you can sign the tag using your finger.
- Capture your customer's authorization signature directly on the device or request a signature via email. To do this, choose the option from each customer you want to proceed with:
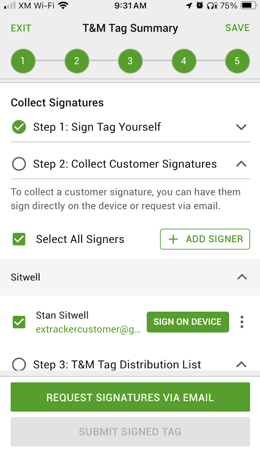
- Sign on Device
- Your customer can type in their first and last name unless it has already been pre-loaded
- Their company name will automatically populate based on what you added in the project.
- They can add any notes to go along with the tag. These notes will be populated on the PDF of the Tag in the "Customer Notes" section.
- Now they can sign with their finger and save:
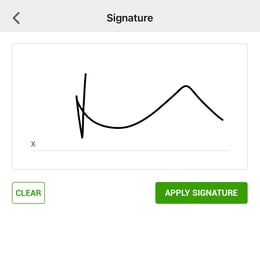
- Sign on Device
How to Copy a T&M Tag
Copying a T&M Tag will copy everything except the signatures. You can copy a tag, make any necessary changes and collect signatures.
1. To copy a T&M Tag, select the three dots on the far right of the T&M Tag
2. Select Create a Copy
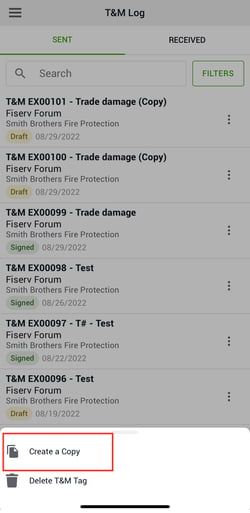
3. This will bring you to the T&M Tag summary screen where you can make any changes if necessary and collect signatures.
How to Filter T&M Log
1. Select Filters

2. Select the necessary filters, select Apply
