
Jump to: Terminology || Integrated Workflows || Setting Up the Integration
Overview
Plexxis is a construction management platform built for specialty trade contractors, with core functions spanning estimating, project management, accounting, payroll, mobile time tracking, and heavy equipment. The Plexxis DataVerse provides API access that enables two-way integrations between Plexxis and external systems.
With the Clearstory & Plexxis integration, project teams can:
Eliminate data entry: Because CORs are automatically logged in Clearstory the moment a T&M tag is signed or a forward-priced change order is created, there is no Change Request data entry required in Plexxis. With the integration, you can push a COR from Clearstory directly into a Plexxis Change Request, eliminating manual re-entry.
Promote Financial Visibility: By making Clearstory the shared source of truth for all CORs on a project, you get a real-time view of your COR exposure. The integration lets you instantly see which CORs have been pushed to Plexxis and which haven't, so you can quickly identify anything missing from your forecast.
Terminology
| Clearstory | Plexxis |
| Project | Job |
| Change Order Request | Change Request (Contract type) |
| COR Number | Contract Number |
Integrated Workflows
Linking Projects Between Plexxis & Clearstory
Before you can push CORs, your Clearstory project must be linked to its corresponding job in Plexxis. This only needs to be done once per project.
- Locate your Clearstory project and open it.
- Under Advanced Settings, click Plexxis, then click Edit.
- Search for and select the matching Plexxis job from the list, then click Save.
- The project is now linked. The Plexxis push functionality will be available on the COR log for this project.
Pushing CORs to a Change Request
Once a project is linked, you can push one or more CORs from the Clearstory COR log directly into a Plexxis Change Request.
- From the COR log, select the COR or CORs you want to push to Plexxis by checking the box next to each one.
- Click the Push to Plexxis button that appears in the toolbar at the top of the log.
- The Select Change Request dialog opens showing the available Change Requests in Plexxis. You can either:
- Select an existing Change Request to add the COR line items to, then click Next, or
- Click Create Change Request to create a new Change Request directly from Clearstory. The new contract number will default to the next sequential number, which you can override.
- The details panel opens. Choose how you want the COR data to be structured as line items in Plexxis using the toggle in the top right:
- Lump Sum — Each COR is pushed as a single line item using its total amount. This is the default and works for all COR types.
- Subtotal — Each COR is broken out by cost category (Labor, Material, Equipment, Other) and pushed as separate line items, one per category subtotal. Available only for CORs that include a resource breakdown.
- Line Item — Each individual resource line item within the COR is pushed as its own separate line item in Plexxis. This is the most granular option and is also available only for CORs that include a resource breakdown.
- For each row being pushed, select an action: Create new line item, Revise an existing line item, or Link to an existing line item in Plexxis.
- For each row, complete the required Plexxis mapping fields:
- Cost Code — Required for all line items. Select from your Plexxis cost code list.
- Activity Code — Applies to Labor line items. Activity codes often match cost codes but not always; select the appropriate one from your Plexxis list.
- Subsection — Select the relevant subsection (for example, a floor or area).
- Item Code — Required for Material line items only. The dropdown shows the first 50 items from your Plexxis library; start typing to search your full material catalog.
- Unit of Measure — Inherited automatically from the selected item code for materials. For labor and equipment, you can select the unit of measure (for example, hours).
- Click Push to Plexxis to submit.
When the transaction is complete, the Plexxis Contract Number is written back to the COR log for future reference, giving your team a clear record of where each COR was sent.
Where COR data lands in Plexxis:
| Clearstory cost type | Plexxis destination |
|---|---|
| Labor line items | Labor tab (with quantity, unit of measure, unit cost, and charge rate from Clearstory) |
| Material line items | Material tab |
| Equipment line items | Equipment tab |
| Other cost types | Other Costs and Charges tab (with cost code, subsection, and a Miscellaneous expense type) |
| Markups | Other Costs and Charges tab |
Note: If a COR is edited or revised after it has already been pushed to Plexxis and its total amount changes, a red indicator will appear on that row in the Plexxis CR column. This signals that the data in Plexxis is now out of sync with Clearstory and the COR should be re-pushed to keep your Change Request up to date.
Filtering the COR Log by Integration Status
After setting up the integration, a Plexxis CR column appears in your COR log. This column gives your team an instant view of which CORs have been pushed to Plexxis and which have not.
- Contract number displayed (e.g., 281): The COR has been pushed and is tied to that Change Request in Plexxis.
- Unassigned: The COR has not yet been pushed to Plexxis.
Use the filter options on the column to quickly segment your log:
- Assigned — Show only CORs that have been pushed to a Plexxis Change Request.
- Unassigned — Show only CORs that have not yet been pushed.
This makes it easy to audit your COR log and ensure nothing is missing from Plexxis without any additional manual tracking
Setting up the Plexxis Integration
The Clearstory integration with Plexxis must be set up by a user with either an Account Owner or Admin role in Clearstory.
Requirements: This integration requires an active Plexxis subscription with DataVerse API access enabled. You will also need your Plexxis Company Domain, Database, Client ID, and Client Secret before completing the setup in Clearstory.
In Plexxis
Clearstory connects to Plexxis through the DataVerse API. Before you enable the integration in Clearstory, someone with access to your Plexxis admin portal needs to create an API account for Clearstory and grant it permission to the specific endpoints Clearstory uses.
Note: This requires an active Plexxis subscription with DataVerse API access enabled. If DataVerse access is not yet turned on for your account, contact Plexxis support before you begin.
- Log in to your Plexxis admin portal.
- Navigate to Account Management.
- Create a new API account and name it Clearstory.
- Save the credentials Plexxis generates for the account. The credentials file contains your Company Domain, Database, Client ID, and Client Secret.
- Open the permissions for the Clearstory API account. Permissions are split into a read side and a write side.
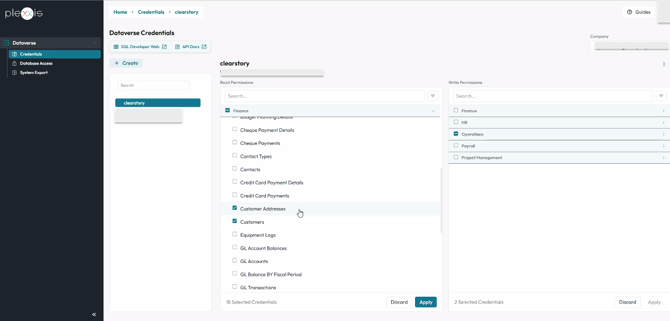
- On the read side, enable each of the following:
| Permission | What Clearstory uses it for |
|---|---|
| Branches | Maps your Plexxis branches to Clearstory offices |
| Jobs | Links Clearstory projects to Plexxis jobs |
| Contracts | Reads existing Change Requests so you can push a COR into one |
| Contract Details | Reads existing line items so you can revise or link to them |
| Contract Statuses | Populates the contract status options |
| Cost Codes | Populates the Cost Code field on every line item |
| Activity Codes | Populates the Activity Code field on Labor line items |
| Job Subsections | Populates the Subsection field |
| Expense Types | Assigns an expense type to Other cost line items |
| Vendors | Populates vendor reference values |
| Items | Populates the Item Code field on Material line items, along with its unit of measure |
- Select Apply to commit the read permissions.
- On the write side, enable the following:
| Permission | What Clearstory uses it for |
|---|---|
| Contract Upsert | Creates and updates the Change Request header in Plexxis |
| Contract Details Upsert | Creates and updates the line items on the Change Request |
- Select Apply to commit the write permissions.
Note: Clearstory authenticates with the Client ID and Client Secret. If those two values are not in the credentials Plexxis provides, request them before you continue.
As new integration features are released, you may be asked to grant additional access.
In Clearstory
- In Clearstory, select Integrations from the left navigation menu.
- Search for Plexxis, then select Manage Integration.
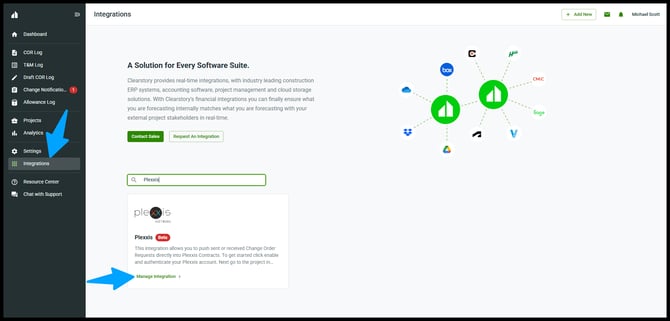
- Select Enable Plexxis Integration.
- Enter the following Plexxis information:
- Company Domain — the company portion of your Plexxis API URL.
- Database — the Plexxis database you want Clearstory to connect to.
- Client ID
- Client Secret
- Enabled Offices — select the Clearstory office or offices that should use this Plexxis configuration.
- Select Continue and complete the remaining prompts to enable the integration.
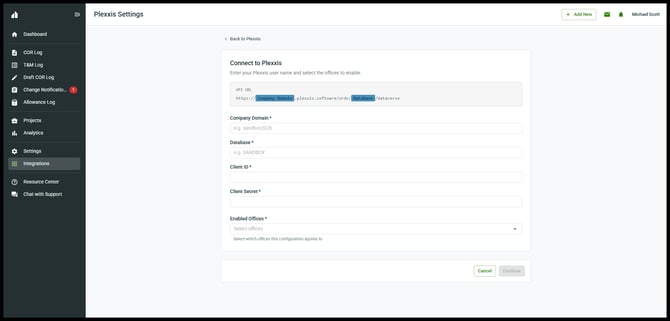
The API URL is constructed using the Company Domain and Database entered during setup:
https://[Company Domain].plexxis.software/ords/[Database]/dataverse