
About AI-generated results
This feature uses AI to generate results such as classifications, summaries, and suggestions. AI-generated results are produced automatically and may be inaccurate or incomplete. They are provided as a starting point, not a guarantee of accuracy, completeness, or fitness for a particular purpose. You should review and validate any AI-generated result before relying on it, and you remain responsible for the final decision to accept, edit, save, or send it.
Table of Contents
- Overview
- How to enable the agent
- How it works
- Staying in control of your COR
- What the agent can help with
- Attaching files for context
Overview
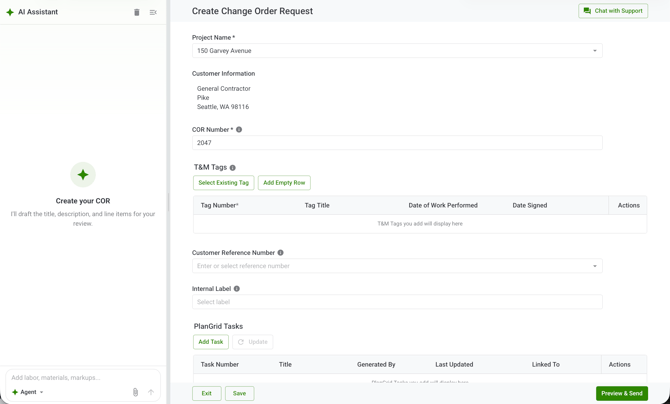
The COR Pricing Agent is an AI agent that lives in a side panel on the Create Detailed COR form. Instead of filling out every field by hand, you can describe the work, pricing, and supporting details in plain language, and the agent helps build the COR for you. It can draft the title and description, add and edit line items, pull in your project rates, read attached files, and explain what it changed.
You can find the agent on the Create Detailed COR form. When AI is enabled for your company and project, the side panel opens next to the form.
How to enable the agent
The agent is available when two things are true:
- AI is enabled for your company.
- AI is enabled for the project you select on the COR.
If AI is turned off at either the company level or the project level, the agent will not appear on the Create Detailed COR form, and the form works as it normally does. If you expect to see the agent and don't, contact your Account Owner to confirm your company and project AI settings.
You also need to select a project before you can start chatting. Until a project is selected, the message box stays disabled and shows a reminder to pick a project first.
How it works
You talk to the agent in a chat panel. You type (or speak) what you want, and the agent responds. The agent has three modes, and you choose the one that matches how much help you want. "Agent" mode is selected by default, and your selected mode stays the same for the rest of your session unless you change it.
The big difference between the modes is how much the agent is allowed to touch your form.
-
Ask mode: Ask mode answers questions but never changes the form. Use it when you want information without any edits. You can ask what is currently in the COR, what the totals or markups are, what a line item covers, or how to complete a section. Ask mode can suggest next steps in plain text, but it will not apply anything. If you ask it to make a change, it will let you know you need to switch to Plan or Agent mode first.
-
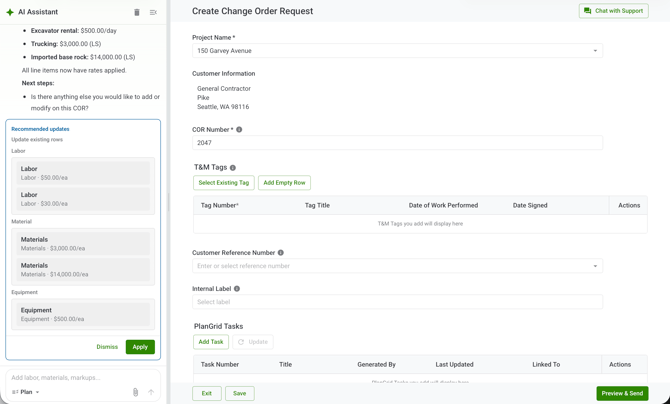
Plan mode: Plan mode recommends changes and waits for your approval before anything is applied. When you ask for a change, the agent shows you recommendation cards that spell out exactly what would change. You can approve, deny, or ignore each one. Nothing touches your COR until you approve it, and anything you deny or ignore leaves the COR unchanged. If you edit a field after the agent recommended a change to it, that recommendation is marked stale so it can't overwrite your newer edit.
-
Agent mode: Agent mode makes changes to the COR directly based on your instructions, without a separate approval step for each one. It can set the title and description and add or edit line items right away. If the agent isn't sure how to complete a request, it will ask you a follow-up question or tell you what information is missing rather than guess. You always remain in control of when the COR is saved as a draft or sent to the customer.
Staying in control of your COR
A few things are always true, no matter which mode you use:
-
The agent never saves, submits, sends, or finalizes a COR for you. It only helps you build the draft. You decide when the COR is ready and you take the final action yourself.
-
You can always edit the form directly. The agent works alongside the form, not instead of it. You can type into any field, adjust line items by hand, and change anything the agent added. The form itself is always the source of truth for your totals, markups, and calculations.
-
When the agent makes a change, it shows a short summary of what it did. When an undo option is available, you can undo a change the agent applied.
-
You can clear the chat and start fresh at any time using the trash icon at the top of the panel. Starting a new chat does not change, clear, or revert your COR draft.
What the agent can help with
Here are the most common ways to use the agent. In each case, you describe what you want in plain language.
Start a new COR from a description. Describe the change in your own words and the agent begins filling out the COR for you.
- Create a COR for the additional excavation, haul-off, and backfill needed after unsuitable soil was found in the northwest corner. Include labor for the crew, equipment time for the excavator, trucking, and imported base rock.
Add labor, material, equipment, other costs, and markup. Describe the work, roles, hours, quantities, rates, and markup conversationally.
- Add 12 hours for a foreman and 24 hours for laborers.
- Add 2 days of excavator rental and apply the standard markup.
When adding pricing, the agent can confirm that it used your project's configured rates.
Add multiple labor roles in one prompt. Describe several roles at once and the agent lists the hours for each before adding them.
- Add labor for a foreman, two laborers, and an operator. The foreman worked 6 hours, the laborers worked 8 hours each, and the operator worked 5 hours.
Add new items to a COR already in progress. Describe the additional work and the agent adds the rows for you.
- Add 4 hours of cleanup work by two laborers.
Edit existing line items naturally. Reference a value in plain language instead of hunting for the field.
- Change the foreman hours from 8 to 10.
- Increase the concrete quantity by 6 cubic yards.
- Reduce the markup on the equipment to 10%.
Correct COR fields through chat. Ask the agent to fix anything that is wrong.
- Change the title to Added Site Drainage Work.
- The labor rate should be 95, not 85.
Write a clearer scope description. Ask the agent to write or improve the description so the GC or owner can understand the change.
- Write a clear description for this COR explaining why the added work was required.
- Make the scope description more professional and easier for the client to understand.
Price out T&M Tags. Ask the agent to price signed T&M Tags from the selected project, or attach paper T&M Tags so the agent can use the information to help build the COR. Review the extracted details before approving any changes.
Attach Received CORs. Ask the agent to find and attach Received CORs to attach to the COR you are creating based on your criteria.
- Attach all Received CORs with reference number PCO 256.
Answer follow-up questions when information is missing. If required pricing information is missing, the agent asks before completing the COR. It may ask for the labor role, hours, quantity, rate, markup, scope description, or supporting details.
Attaching files for context
You can attach supporting files to a chat message so the agent has more context. Useful attachments include paper T&M Tags, field notes, correspondence, and backup for labor, material, or equipment costs.
-
Supported file types are PDF, JPG, JPEG, PNG, XLSX, and CSV.
- You can attach up to five files at a time.
- You can remove an attachment before sending, and removed files are not used.
- Attached files stay available for the rest of that chat session, so you can refer back to them later without re-uploading.
Always review the information the agent pulls from an attachment before approving changes to the COR.